Emisar D4V2: Updating firmware (Anduril UI) with macOS
It can feel daunting to update the firmware on your Emisar D4V2, especially if you’ve never done it before. What if you brick your beautiful light? What if you load the wrong file?
Keeping up with new updates of Anduril is one of the great features of owning the D4V2, so this guide is here to help walk you through the process so you’ll feel more confident in updating your light.
What you’ll need
- Emisar D4V2 (duh!)
- Reflashing kit
- Apple Mac computer running macOS
- Anduril HEX file for your D4V2
- USB-C to USB adapter (if your Mac doesn’t have a USB-A port, I use my AV Multiport adapter)
NOTE: This guide is for reflashing with an Apple Mac computer. If you have an Android device, you can instead use it to reflash your D4V2 using an OTG (On The Go) adapter.
Prepare your Mac
-
Install Xcode’s command line tools:
$ xcode-select --install -
Install Homebrew:
$ /bin/bash -c "$(curl -fsSL https://raw.githubusercontent.com/Homebrew/install/master/install.sh)" -
Install avrdude, which is the software we’ll be using for flashing the light:
$ brew install avrdude
Prepare the light and reflashing kit
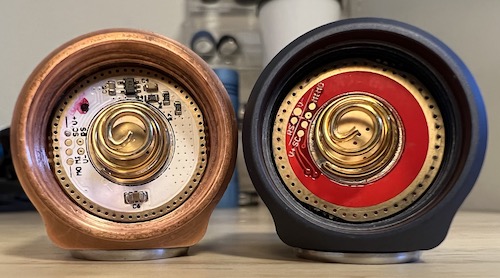
 The flashing pads are 2 rows of 6 gold pads on the left side of the spring on the drivers above
- Unscrew the head of your D4V2 so the driver is exposed.
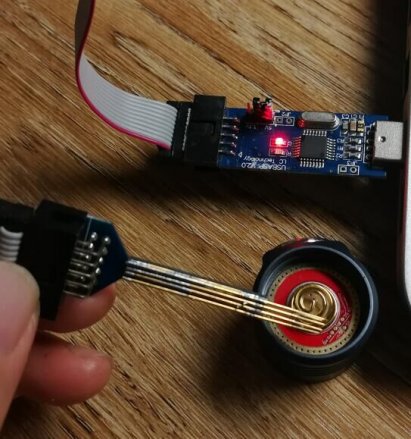
- Plug in your reflashing kit to your USB port (and USB-C to USB adapter if needed). There should be a steady red light on the reflashing kit.
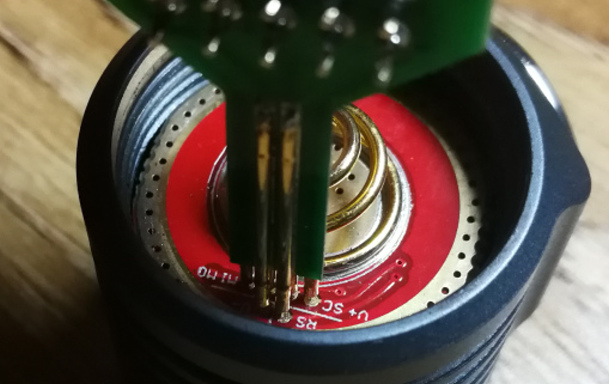
- Practice aligning the pogo pins of the reflashing kit with the flashing pads on the driver. On lights where I have a backlit switch, I’ll notice that sometimes the button will light when I’m making good contact. If your D4V2 does this, then it’s a good way to help you make sure you’re holding the reflashing kit properly. You shouldn’t have to push that hard: just enough for the pogo pins to retract.
 The reflashing kit’s red light is on and we’re getting ready to flash
Test the connection
-
Enter this command to test your connection with avrdude:
$ avrdude -c usbasp -p t1634 -n -
When the test succeeds, you’ll see a result that looks similar to this:
avrdude: warning: cannot set sck period. please check for usbasp firmware update.
avrdude: AVR device initialized and ready to accept instructions

Reading | ################################################## | 100% 0.00s

avrdude: Device signature = 0x1e9412 (probably t1634)

avrdude: safemode: Fuses OK (E:FF, H:DE, L:E2)

avrdude done.  Thank you.
If you’re getting an error like “Target doesn’t answer”, you’re probably not aligning the pogo pins and flashing pads. Adjust the pins and try again.
Flash your light
 Make sure you’re making good contact between the pogo pins and the flashing pads
-
Run avrdude, where
[path_to_hex_file.hex]is the Anduril HEX file you previously downloaded:$ avrdude -c usbasp -p t1634 -u -Uflash:w:[path_to_hex_file.hex]I like to type this command out before holding the reflashing kit to the driver. That is, I keep one hand pushing the pins down on the pads and the other hand presses
<Enter>on my keyboard to run the command. At this point, I feel like I’m Richard Pryor from Superman 3. -
When you’re successful, you’ll see output that looks similar to this:
avrdude: warning: cannot set sck period. please check for usbasp firmware update. avrdude: AVR device initialized and ready to accept instructions Reading | ################################################## | 100% 0.00s avrdude: Device signature = 0x1e9412 (probably t1634) avrdude: NOTE: "flash" memory has been specified, an erase cycle will be performed To disable this feature, specify the -D option. avrdude: erasing chip avrdude: warning: cannot set sck period. please check for usbasp firmware update. avrdude: reading input file "anduril.noctigon-kr4-nofet.hex" avrdude: input file anduril.noctigon-kr4-nofet.hex auto detected as Intel Hex avrdude: writing flash (8872 bytes): Writing | ################################################## | 100% 6.67s avrdude: 8872 bytes of flash written avrdude: verifying flash memory against andurilnoctigon-kr4-nofet.hex: avrdude: load data flash data from input file anduril.noctigon-kr4-nofet.hex: avrdude: input file anduril.noctigon-kr4-nofet.hex auto detected as Intel Hex avrdude: input file anduril.noctigon-kr4-nofet.hex contains 8872 bytes avrdude: reading on-chip flash data: Reading | ################################################## | 100% 4.53s avrdude: verifying ... avrdude: 8872 bytes of flash verified avrdude done. Thank you. -
Awesome work! You’ve made it this far, and you’re in the home stretch.
Factory Reset
After you’ve flashed the light, I recommend that you do a factory reset.
Test out your D4V2
Great work! You’ve flashed a new firmware and both you and your precious D4V2 are still intact and running properly. Give yourself a pat on the back, fire up disco mode, and bring light and joy to the world!
Troubleshooting
Having trouble? Light not turning on after reflashing? Check out common problems that come up during reflashing and fixes.
Additional Resources
- Getting and flashing Anduril on macOS
- BudgetLightForum: Anduril flashing guides - Win10 and macOS
- BudgetLightForum: Emisar D4V2 Flash Kit Instructions (Official How To)
- r/flashlight: Flashing firmware on my D4V2 was surprisingly easy!
- r/flashlight: Can I use a flashing kit to change my single channel D4V2 from Andruil I to Andruil II?
