Sofirn BLF LT1 Lantern Manual (Anduril 1)
This page refers to features of Anduril 1.
You may be looking for the Anduril 2 manual or Check if you're running Anduril 1 or 2.
The Sofirn BLF LT1, similar to the Emisar D4V2, runs on the Anduril UI firmware. There are some features that the BLF LT1 has that the standard D4V2 doesn’t have and vice versa, such as: Tint Ramp, Temperature Check, Thermal Config, and Aux LEDs.
This is a manual that’s customized for the features of the BLF LT1.
Big thanks to DBSAR for designing the BLF LT1 and ToyKeeper for work on Anduril UI.
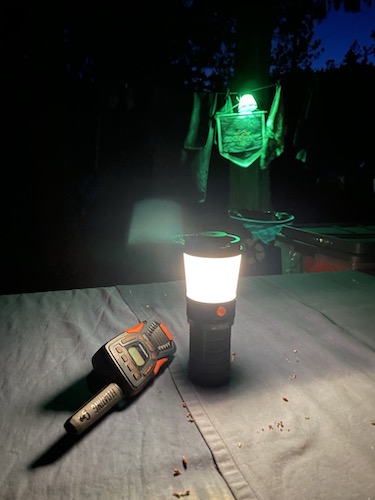 The BLF LT1 makes for a perfect area light, ideal for camping or power outages
Anduril User Manual
Anduril is an open-source firmware for flashlights, distributed under the terms of the GPL v3. The sources can be obtained here:
Quick Start
After putting a battery in the light and tightening the parts together, the light should quickly blink once to confirm it has power and is now operational. After that, basic usage is simple:
Clickto turn the light on or off.Holdthe button to change brightness.Release and holdagain to change brightness the other way.
That is all the user needs to know for basic use, but there are many more modes and features available for people who want more.
Before reading the rest of this manual, it is recommended that users look at the Anduril UI diagram, which should be provided along with the flashlight.
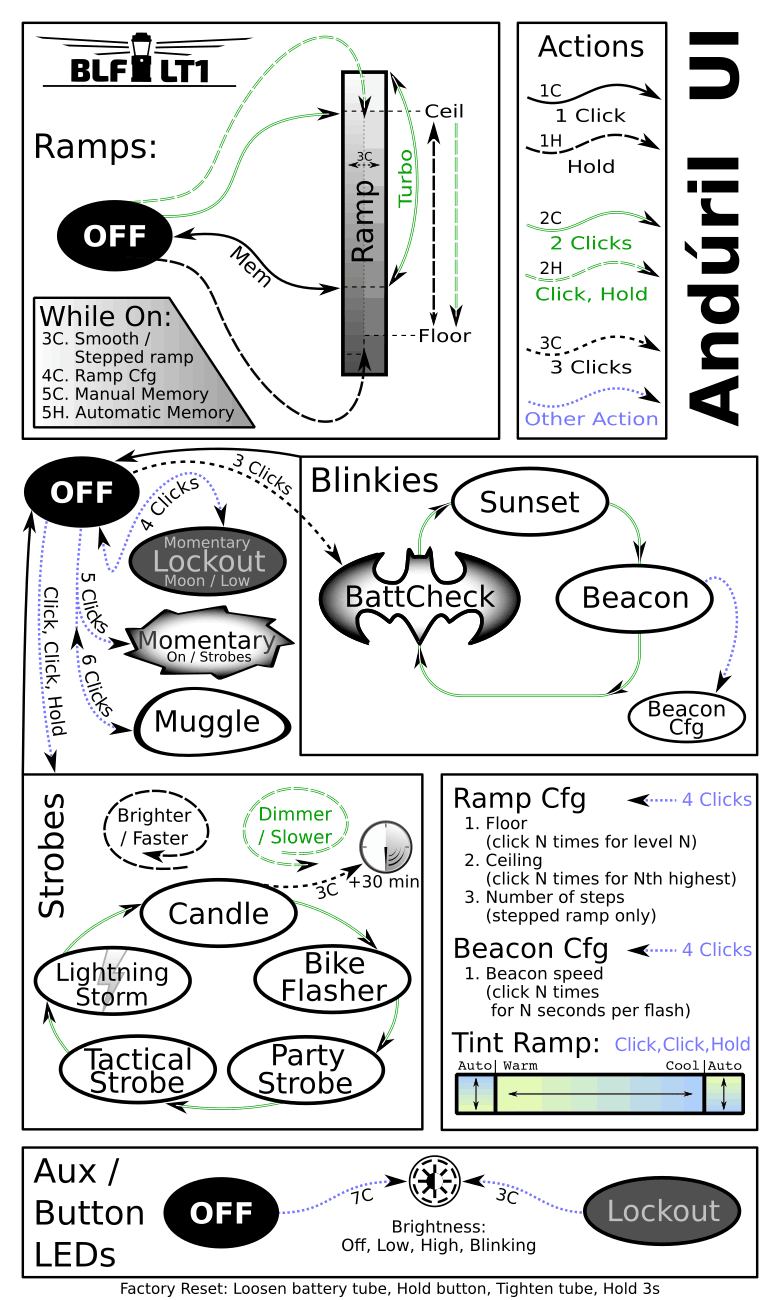 Sofirn BLF LT1 Anduril UI diagram
Ramping / Stepped Ramping Modes
Anduril’s normal operation mode uses a smooth ramp or a stepped ramp, depending on which style the user prefers.
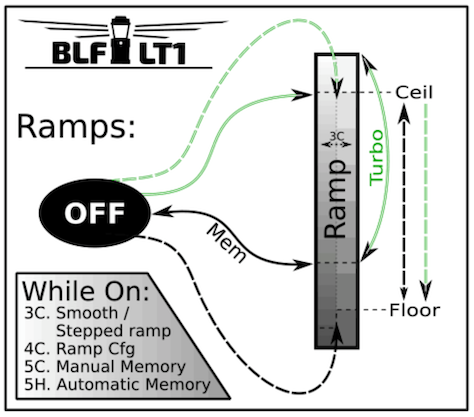 BLF LT1 Ramping Mode
Each ramp has its own settings – floor (lowest level), ceiling (highest level), and the stepped ramp can also have a configurable number of steps.
There are four ways to access this mode when the light is off:
Click: Turn on at the memorized brightness.Hold: Turn on at the floor level. The light should give a very subtle dark blink when the user can let go of the button to stay at the floor, or keep holding the button to ramp up.2 clicks: Turn on at the ceiling level.Click, hold: Turn on at the ceiling level, then ramp down.
While the light is on, a few basic actions are available:
Click: Turn off.2 clicks: Go to or from turbo (full power).Hold: Change brightness (up). If the button was released less than a second ago, or if it’s already at the ceiling, it goes down instead.Click, hold: Change brightness (down).3 clicks: Switch to the other ramp.4 clicks: Go to ramp config mode.5 clicks: Activate manual memory and save the current brightness.5 clicks, but hold the last click: Go back to automatic memory.
The “automatic” vs “manual” memory modes change the level the light goes
to with 1 click from Off. In automatic mode, it uses the last
brightness the user ramped to. In manual mode, it uses the brightness
the user explicitly saved with 5 clicks.
Other Modes
Anduril has several other modes too. To access these, press the button more than 2 times when the light is off:
3 clicks: Access the blinky modes.Click, click, hold: Access the strobe modes.4 clicks: Lockout mode.5 clicks: Momentary mode.6 clicks: Muggle mode.
Blinky Modes
Click 3 times from Off to access Anduril’s blinky modes. This
always starts at battery check and the user can proceed to other blinky
modes from there. The sequence is:
- Battery check.
- Sunset mode.
- Beacon mode.
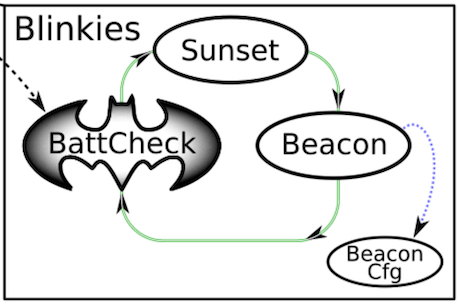 Beware of fast blinking lights in Blinky Modes
In all of these modes, some basic actions are available:
Click: Turn off.2 clicks: Next blinky mode.
Additionally, in beacon:
4 clicks: Go to the beacon config mode.
In more detail, this is what each blinky mode does:
-
Battery check.
Blinks out the battery voltage per cell. Full is 4.2V, empty is about 3.0V. The light blinks the whole-number digit first, pauses, then blinks out the “tenths” digit. Then a longer pause, and it repeats. So for 4.2V, it would be “blink-blink-blink-blink .. blink-blink”.
A “zero” digit is represented by a very quick blink.
-
Sunset mode.
This starts at a low level, then dims gradually for an hour, and then shuts off. It is intended for use when going to bed.
-
Beacon mode.
Blinks at a slow speed. The light stays on for half a second, and then stays off until the next blink. The brightness and the number of seconds between pulses are configurable:
-
Brightness is the user’s last-ramped level, so set this in ramping mode before starting beacon mode.
-
Speed is configured in beacon config mode.
Click 4 timesto enter beacon config mode, wait for the light to stutter, thenclickto enter the number of seconds per blink. For example, to do a 10-second alpine beacon, click10 times.
-
Strobe Modes
Anduril includes a few extra modes for a variety of purposes:
- Candle mode
- Bike flasher
- Party strobe
- Tactical strobe
- Lightning storm mode
Click 3 times from Off to access these, but hold the third click for a
moment.
Click, click, hold. The last-used strobe mode is remembered,
so it will return to whichever one you used last.
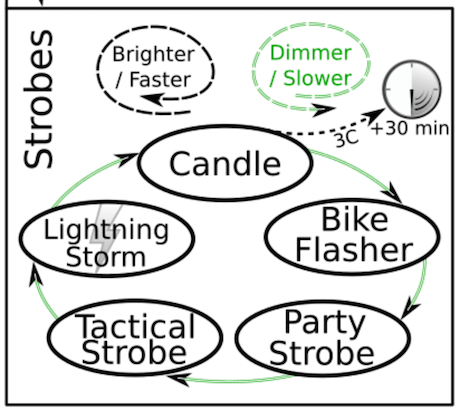 Strobe Modes
In all of these modes, a few actions are available:
Click: Turn off.2 Clicks: Next strobe mode.Hold: Increase brightness, or strobe faster. (except lightning)Click, hold: Decrease brightness, or strobe slower. (except lightning)
Additionally, candle mode has one more action:
3 clicks: Add 30 minutes to the timer.
In more detail, here is what each mode does:
-
Candle mode
Brightness changes randomly in a pattern resembling a candle flame.
If a timer is set, it will run until the timer expires, then get dimmer for one minute, then sputter and turn itself off. Without a timer, candle mode runs until the user turns it off. Brightness is configurable. -
Bike flasher
Runs at a medium level, but stutters to a brighter level once per second. Designed to be more visible than a normal ramping mode, but otherwise works mostly the same. Brightness is configurable.
-
Party strobe
Motion-freezing strobe light. Can be used to freeze spinning fans and falling water. Speed is configurable.
-
Tactical strobe
Disorienting strobe light. Can be used to irritate people. Speed is configurable, and the duty cycle is always 33%.
-
Lightning storm mode
Flashes at random brightness and random speed to simulate lightning strikes during a busy lightning storm. Do not look directly at the flashlight when this mode is running, because it may suddenly go to full power without warning.
Lockout Mode
Click 4 times from Off to enter Lockout mode. This makes the light safe
to carry in a pocket or a bag or anywhere else the button might be
pressed by accident.
To exit lockout mode, click 4 times. The light should blink briefly and
then return to the regular Off mode.
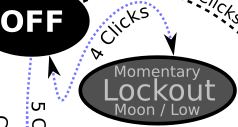 Entering and exiting Lockout Mode
Lockout mode also doubles as a momentary moon mode, so the user can do quick tasks without having to unlock the light. The brightness in lockout mode has two levels:
Hold: light up at the floor level of the current ramp.Click, Hold: light up at the floor level of the other ramp.
Momentary Mode
Click 5 times from Off to enter Momentary mode. This locks the
flashlight into a single-mode interface where the LEDs are only on when
the button is held down. It is intended for Morse code, light painting,
and other tasks where the light should be on only for a short time and
probably in a pattern.
Momentary mode does either a steady brightness level or a strobe. To
select which one, go to the mode you want to use, adjust the brightness
and speed and other settings, then turn the light off. Then click 5 times
to enter momentary mode.
Supported momentary modes are:
- steady (normal ramping mode)
- strobes (everything in the “strobe” mode group)
In steady mode, brightness is the last-ramped level, so adjust that before entering momentary mode.
In momentary strobe mode, the settings are copied from the last-used strobe mode, such as party strobe, tactical strobe, or lightning.
To exit this mode, physically disconnect power by unscrewing the tailcap or battery tube.
Muggle Mode
Click 6 times from Off to enter Muggle mode.
This is a simpler and
less-bright interface which makes the light relatively safe to lend to
children or other people who could use the light unsafely.
In Muggle mode, there are only a few available actions:
Click: Turn the light on or off.Hold: Change brightness.6 clicks: Exit Muggle mode.
The brightness in this mode usually goes from about 10 lm to 300 lm.
Muggle mode is remembered even after changing the battery. This helps prevent children from exiting the mode by unscrewing the tailcap. However, be sure to supervise children whenever they are using any powerful tools, including a bright flashlight.
Configuration Modes
Every config mode has the same interface. The menu has one or more options the user can configure, and it will go through them in order.
For each menu item, the light will follow the same pattern:
-
Blink one or more times, corresponding to the item number.
-
Stutter or “buzz” quickly between two brightness levels for a few seconds. This indicates that the user can
click one or more timesto enter a number. It will keep buzzing until the user stops clicking, so there is no need to hurry. -
Pause, and then go to the next option.
After the light has gone through all of the menu options, it should return to whatever mode the light was in before entering the config mode.
If the user doesn’t press a button during a menu item’s “buzz” phase, that item remains unchanged from its previous value.
Ramp Config Mode
While the light is on in a ramping mode, click 4 times to enter the
config mode for the current ramp.
For smooth ramping mode, there are two menu options:
For the stepped ramping mode, there are three menu options:
To configure the floor level,
click the button equal to the number of ramp levels (out of 150) at which the floor should be. To set the
lowest possible level, click once.
To configure the ceiling level, each click goes one level lower. So 1 click
sets the highest possible level, 2 clicks is the 2nd-highest, 3 clicks
is the 3rd-highest level, etc. To set the value of 130/150,
click 21 times.
When configuring the number of steps, the value can be anything from 2 to 150.
Tint Ramp Configuration
The LT1 has adjustable light Correlated Color Temperature, or CCT. The variation available is between what is commonly known as Warm (2800K) or Daylight (5000K). To adjust the CCT, while the LT1 is on, click, click, hold to change the tint. The tint ramp goes from warm to cool with an auto tint mode at each end, which changes the tint automatically as brightness changes. To reach the auto tint mode, ramp all the way to either end. The end of the tint ramp is noted by a brief flicker of the output brightness. Keep holding for about a second, and a flicker in the output brightness will occur, and the tint will change indicating auto tint mode. There are two auto-tint modes… one at each end of the ramp. They have opposite orientations for which CCT is used for low brightness and which one is used for high brightness. Experiment and see which you prefer.
Switch Backlight
The switch LED can be configured to different options while the main emitters are off. There is an option for the regular Off mode, and another option for Lockout mode. This allows the user to see at a glance whether the LT1 is locked.
Switch LED modes include:
- Off
- Low
- High
- Blinking
To configure the LED, go to the mode you want to configure and then click the required number of times:
- Off mode:
7 clicks. - Lockout mode:
3 clicks.
The mode will be visible on the switch as you change it, except blinking has a bit of a delay before it starts. If you keep applying the number of clicks shown for either mode the backlight behavior keeps cycling through the options shown.
The switch LED stays on while the main emitters are on. Its brightness level is low when the LT1 is at output 64 or lower, and on high when the output level is at 65 or higher. As mentioned above, the user can configure how the switch backlight behaves when the emitters are off.
Protection Features
Anduril includes low voltage protection (LVP).
LVP makes the light step down to a lower level when the battery is low, and if the light is already at the lowest level, it shuts itself off.
This activates at 2.8V. LVP adjustments happen suddenly, in large steps.