Lumintop FW3X slow Anduril blinks fix
When I received my Lumintop FW3X, I noticed some strange behaviors from the flashlight: doing a battery check read out would take an extremely long time, and the same was true for doing an Anduril version check. Any kind of feedback from the light would take a lot longer than I’d expected.
It turns out that many FW3X’s come shipped with misconfigured fuses, making most of Anduril pretty much unusable.
To fix the light, I needed to use Hank’s flashing kit with some modifications to work with the FW3X. Here’s instructions on how I did it.
Requirements
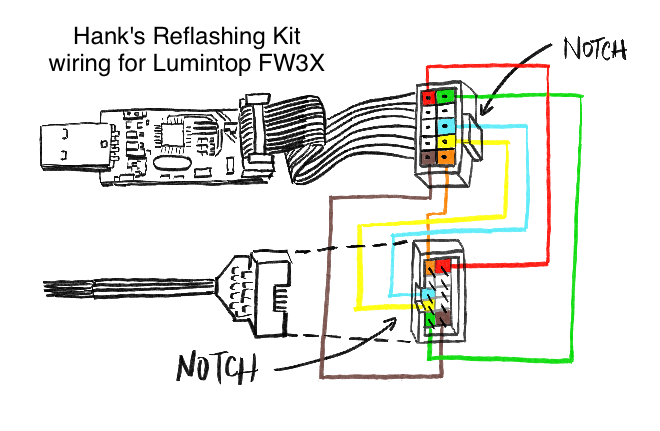
- Hank’s Reflashing Kit
- DuPont/jump wire (male to female)
- Computer with
avrdudeinstalled on it
Hook up wires
- Unplug the wire from the head with needles from Hank’s Reflashing Kit. Keep the other end of the wire plugged into the board with the USB plug on it.
- Take the male ends of your DuPont/jump wire and connect them to the kit’s ribbon cable connector. Be sure to note which side the notch (which bulges out) is on.
- Take the female ends of your DuPont/jump wire and connect them to the kit’s head’s male pin header. Be sure to note which side the notch (which is indented in) is on.
Test the connection
Now it’s time to make sure you’ve wired everything up properly. I made a lot of false starts and mistakes when attemping my wiring until I finally got this test to work, so don’t be discouraged if it doesn’t work the first time. Be sure to check your wiring and that everything’s securely plugged in.
-
Plug in the kit to your computer’s USB port
-
Push the pogo pins into your Lumintop FW3X’s driver on the corresponding flashing pins
-
On your computer, enter the command:
avrdude -c usbasp -p t1634 -n -
This is what a successful test looks like:
avrdude: warning: cannot set sck period. please check for usbasp firmware update.
avrdude: AVR device initialized and ready to accept instructions

Reading | ################################################## | 100% 0.00s

avrdude: Device signature = 0x1e9412 (probably t1634)

avrdude: safemode: Fuses OK (E:FF, H:DF, L:62)

avrdude done.  Thank you.
It will likely take you several attempts to get a valid reading. Be sure to get a good alignment of the pins. Recruit the help of another flashlight from your collection to give yourself some good lighting so you can see the pins are properly aligned.
Set the Low Fuse
We want to set the low fuse to: 0xE2.
-
Enter the command:
avrdude -c usbasp -p t1634 -U lfuse:w:0xE2:m -
When it succeeds, it should output something like:
avrdude: warning: cannot set sck period. please check for usbasp firmware update.
avrdude: AVR device initialized and ready to accept instructions

Reading | ################################################## | 100% 0.00s

avrdude: Device signature = 0x1e9412 (probably t1634)
avrdude: reading input file "0xE2"
avrdude: writing lfuse (1 bytes):

Writing | ################################################## | 100% 0.01s

avrdude: 1 bytes of lfuse written
avrdude: verifying lfuse memory against 0xE2:

Reading | ################################################## | 100% 0.00s

avrdude: 1 bytes of lfuse verified

avrdude done.  Thank you.
Set the High Fuse
We want to set the low fuse to: 0xDE.
-
Enter the command:
avrdude -c usbasp -p t1634 -U hfuse:w:0xDE:m -
When it succeeds, it should output something like:
avrdude: warning: cannot set sck period. please check for usbasp firmware update.
avrdude: AVR device initialized and ready to accept instructions

Reading | ################################################## | 100% 0.00s

avrdude: Device signature = 0x1e9412 (probably t1634)
avrdude: reading input file "0xDE"
avrdude: writing hfuse (1 bytes):

Writing | ################################################## | 100% 0.01s

avrdude: 1 bytes of hfuse written
avrdude: verifying hfuse memory against 0xDE:

Reading | ################################################## | 100% 0.00s

avrdude: 1 bytes of hfuse verified

avrdude done.  Thank you.
Test your changes
- Make sure you have a fully charged 18650 battery in the FW3X.
- Screw the head back on the FW3X.
- Enter
3Cto test out Battery Check. - Voila! It shouldn’t take you the whole afternoon just to check the battery level anymore.